Wednesday, August 31, 2011

Getting hit with The Bird and Squashing Dinner!

I got hit by a bird today...

...Nope, I don't mean that as any kind of metaphor for the direction my life is going. I literally had a bird fly into my arm as I was walking into work. I didn't know they did that! But who am I to judge? Clearly the little dude had far too much to drink last night and was attempting a "wing of shame" when I stepped directly in his path and made him look ridiculous in front of the rest of the flock! On that note, I am blaming the fact that I haven't posted a recipe I made Monday until today on being a victim of bird-on-human violence...it makes sense, just go with it.

Anyway, on Monday The Roommate found an interesting recipe on iVillage for sausage links simmered in a "stew" of pumpkin and other veggies. Well, I was in the mood for some soup and had cajun sausage left over from the shrimp and grits so I thought I'd try it out.

It was super easy, relatively fast, and absolutely delicious. The broth was much more flavorful than I anticipated! Obviously ya can't find pumpkin as easily in August, so I used a butternut squash, which added a depth and sweetness I definitely didn't expect. The Roommate and I both agreed that we instinctively knew we preferred the squash to pumpkin!

I also used Emril's Essence, but you can also use half a teaspoon of each of the ingredients in Essence as well-paprika, garlic powder, italian seasoning (or oregano and thyme), black pepper, onion powder, and 1/8tsp of cayenne pepper-these should give you a similar taste. Anyway, enough talk. Let's Cook....

Squash that Stew! 4-6 servings


      2 Tbsp olive oil
      4 italian sausage links (any kind of sausage links work here-I used cajun), chopped
      1 medium onion, chopped  
      3 carrots, peeled and chopped into 1/2" pieces
      1/2 large butternut squash, peeled and chopped in 1" squares
      1 potato, chopped
      8 oz mushrooms, sliced
      1 tsp ground cumin (I went out and bought cumin for this recipe...so.worth.it!)
      1 can white beans, drained
      4c chicken broth
      2 bay leaves
      1/2 Tbsp Emril's Essence (or 1/2tsp of each ingredient)

In a dutch oven-or heavy-bottom 6 qt pot, heat oil over medium-high heat. Brown the sausage, 4-5 min, stirring continuously-set aside on a plate.

Add the onions and cook until translucent, 4-5 min. Add the remaining ingredients.

Bring to a boil and return sausage to pot. Reduce heat to medium-low.

Cook for 20-25 min until squash and potatoes are tender when pierced with a fork.

Remember to remove bay leaves before serving! Serve with bread for dipping.


This soup was light and fresh, just what you want in an end-of-summer evening meal! My favorite part-it reheats in the microwave really well and made everyone at the office jealous because it had an incredible aroma! Don't ask questions, you just need to Squash It!

Sunday, August 28, 2011

Buffalo Chicken Dip, Cheese, and Bread? Um Yes Please?!

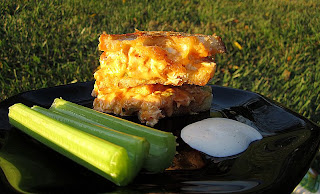
Ok, friends! This past week I had promised The Roommate that I'd try an idea she saw on Closetcooking.com Buffalo Chicken Grilled Cheese, so this weekend it was obvs time to pay up! Of course, she doesn't like cheese..so she just wanted bread and buffalo chicken...but I still love the enthusiasm. And I definitely love having someone to bounce my ideas off of! This recipe can be done with any shredded cooked chicken, just as buffalo chicken dip. I didn't have any cooked chicken so I dusted 7 chicken tenders with Emril's Essence (because I have some pre-made all the time. Good.Decisions!) and pan seared them in olive oil for about 3 min a side. Then, because I'm far too impatient to wait for them to cool and shred the chicken, I diced it. I came out with about 2c of shredded chicken. With that in mind....

Buffalo Chicken Cheesy Sandwich 3-4 servings


     2c shredded chicken
     2 1/2 Tbsp hot sauce
     1/4c Mayonnaise
     1 1/2 Tbsp Ranch Dressing
     1/2c celery, diced
     2 Tbsp red onion, diced finely
     blue cheese crumbles
     shredded (or sliced) cheddar cheese
     sliced bread

In medium bowl, mix chicken, hot sauce, mayo, ranch, celery, and red onion. I, of course, used a broiler to melt my shredded cheddar and blue cheese, but you could easily make a grilled cheese on the stove-especially with slices. I used about 1/4c shredded cheddar and 2 Tbsp blue cheese crumbles for my broiler sandwich. It would probably be equivalent to two 1/4" slices of cheddar and the same amount of crumbles. Just toast as you would a regular grilled cheese with the buffalo chicken "dip" in the middle. 

I also devoured the quick-make dip on celery sticks, trying my best to keep my fingers out of the bowl. The roommate seemed to be quite thrilled with the outcome, I mean she tore herself away from the seat-gripping episode of Teen Mom she was watching. So I can only assume I met expectations...


I also had a thought that this would probably be tasty as a dressing/topping on a salad of fresh greens if you wanted to fake some healthy...I'll definitely be trying this plan...

Friday, August 26, 2011

An Epic Send-off and the Journey to Foodgawker.com


 Ok, I have NOT been keeping up...well it seems like that, but really I've been cooking up a storm and photographing like mad! Lies, you say?! Clearly you're asking for a breakdown of My Life in Cooking since Wednesday...right? Well that's what I heard so here we go..

On Wednesday, I had the little sister over, she tweeted me afterward actually, but I didn't have anything new posted yet...how embarrassing!! Well, she only had a little bit of time before she and my dad went boating on her laser-aka mini sailboat-so I made her the Smokin' Golden Apple grilled cheese from Tuesday night's post...she KILLED it! I made it up and slapped it down in front of her, she stopped mid-inhale to announce that "there's apple in this sandwich! Ohmygod, how'd you get the apple to taste so good in a ham and cheese sandwich?!" ...Magic little sis...it's magic...
Later that night, I discovered that anyone can submit pictures to Foodgawker.com, naturally it has become the driving force to my life. I eat, dream, and live Foodgawker! I'm sure it goes without saying, at this point, that I am literally driving The Roommate and Work Friend crazy with my new obsession. However, they're taking the progressive madness very well and Work Friend even suggested I get a variety of Fancy plates at Good Will...I have done so and would like to say Thank You to both The Work Friend annnd Good Will! Credits aside, let's continue our adventure on to Thursday...

Thursday was The Going Away Party of the century!! One of my closest friends is in school to be a Physician Assistant and she's headed back to school this weekend. Naturally, Foodie Friend, The Roommate, and I had a meeting of the minds to design the ultimate going-away dinner for our PA Friend. It's only fair, as one day she'll be making bank and we'll all be her charity cases. After much deliberation, we decided on;

Shrimp and Grits (my contribution)-and yes, the picture is seriously weak...
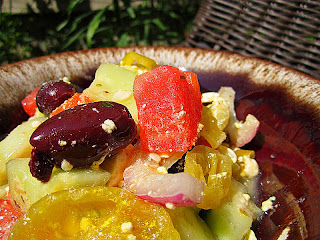
Greek Salad (a regular of Foodie Friend)
Raspberry Mojitos (The Roommate bringin on the party)
Angel Food Cake Roll-filled with whipped cream and strawberry slices (Foodie Friend is a baking genius!)

Let's get down to the di-rections, shall we?

Shrimp n' Grits 5-8 servings
Adapted from Foodnetwork.com


       Grits:
            2c chicken stock
            1c white cornmeal
            1c heavy cream
            1Tbsp butter (if salted, no need to add additional salt)
            Salt and Freshly-ground Pepper
       Shrimp:
            2 Tbsp olive oil
            1 medium white onion, minced
            1 garlic clove, pressed or minced
            1 lb Andouille sausage, chopped into chunks (any spicy sausage works)
            2 Tbsp All-purpose flour
            2c chicken stock
            2 bay leaves
            2 lbs shrimp, peeled and deveined-tails off
            Salt and Pepper

To make grits, bring chicken stock to boil in med saucepan over med-high heat. Slowly, whisk in cornmeal. When the grits begin to bubble, turn heat down to med-low and simmer-stirring with wooden spoon. If you have any trouble with grits becoming too dry, adding water to maintain their smooth texture won't hurt anything. Allow to cook 10-15 min, until mixture is smooth and thick. Remove from heat and stir in heavy cream and butter, season with S&P.

To make the shrimp, heat olive oil in deep frying pan over medium heat. Saute onion and garlic until soft, about 2 min. Add the sausage and cook, stirring, until brown and there is a noticeable amount of fat in the pan. Stir in flour, stirring to avoid lumps, to form a roux. Slowly pour in chicken broth, stirring constantly to avoid lumps. Drop in bay leaves. When liquid begins to simmer, add the shrimp. Allow shrimp to cook in simmering gravy, about 2-3 mins, until firm and pink-feel free to stir shrimp around every so often so they pink evenly.

To serve, put grits in serving bowl, then mix in shrimp and gravy. Serve immediately.

Lettuce-Free Greek Salad 

     1 large cucumber, chopped
     4 roma tomatoes, chopped
     3/4c Kalamata olives
     1/2c peperocini rings
     1 red onion, sliced thinly
     1/2 - 3/4c Feta cheese, crumbled
     3/4c extra virgin olive oil

Toss all ingredients together, for best flavor allow salad to chill for 30-60mins before serving. It's even more delicious the next day for leftovers as all the flavors get a chance to meet and mingle. Good.Situation.

Raspberry Mojito 2 quarts
     1/2c lime juice
     1 packet Crystal Light Raspberry Ice drink mix (enough for 2qts of fluid)
     1/2c fresh mint leaves
     1c white rum (we used Bacardi)
     seltzer      
     ice cubes

In 2 qt pitcher, add drink mix to lime juice and stir until dissolved. Muddle mint leaves into lime juice mixture. Add rum and finish with enough seltzer to hit 2 qts of fluid. Serve over ice, serve immediately. 

Ok, I know you're all dying to see the angel food cake roll, but as everyone knows-you always have to leave em wanting more...and that's just what I'm about to do! I mean why buy the cow if you get the milk for free?! Stay tuned for the delicious update!!

I have submitted another picture to Foodgawker and have no doubt it will be rejected, so to give you a preview...this is my next submission...


I think I've done almost everything I could, it's not artsy, it's in a pretty bowl, it's cropped perfectly squarely...what more could they possibly want from me?!


Tuesday, August 23, 2011

Grilled Cheese Night Just Got an Upgrade...

Prosciutto Much?
 Allllrighty, this is the second day of following my recipe plan and so far, so good! That's right, tonight I made fancy grilled cheese...well they kind of turned into ham and cheese...but then I got prosciutto...ok, ok, it definitely ended up going a different direction than "grilled cheese." Especially because I found smoked Swiss...I knew smoked cheddar was around, but smoked Swiss?? This exists?! Anyway, TRUST me, they were insanely delicious cheesy experiments and that's all that mattered! Naturally, I used my new favorite technique, broiling, to melt the cheese before I browned the sandwiches. These are a little higher caliber sandwiches and could definitely be served for a friendly sophisticated dinner with a light salad or soup. My favorite salads involve romaine lettuce, arugula, spinach, dried cranberries, and balsamic vinaigrette.

Now prosciutto is a dry-cured Italian, deliciously salty, ham that I have never purchased, but discovered today is INSANELY EXPENSIVE. Um 25 dollars a pound?! Well I was just making sandwiches for myself, so I splurged...6 slices for 6 dollars...I say if you don't completely lose your senses around a deli counter-like Yours Truly-just use a thinly-sliced flavorful ham. However, to give in to the Snobby Foodie deep within-the prosciutto reeeally added a rich, salty, light flavor that made for a spectacular "Grilled Cheese." I made two tonight...

The Smokin' Golden Apple...
       2 slices quality bread, buttered on one side
       Smoked Swiss Cheese, enough to cover each slice of bread (or 2 slices Swiss Cheese)
       2 1/4" slices Golden Delicious Apple
       1 slice prosciutto (can also use ham)

Heat the broiler. Place the bread slices, butter-side-down in a frying pan. Layer cheese on top of each slice. Put frying pan in oven about 5" from broiler, with oven cracked open, until cheese begins to melt-3-4min. 

Once cheese has melted, place an apple slice on each side of sandwich, then prosciutto (or ham) on one side.


Place on stove over medium heat, after each half is lightly browned put sandwich together and finish cooking to desired brown. Serve Immediately.


       The Cheesy Tomata
       2 slices quality bread, buttered
       2 slices Swiss Cheese
       2 slices tomato (enough for one layer, completely covering bread)
       1 slice prosciutto (or ham)

I followed the same procedure as in the first sandwich. I used a little extra tomato and cheese because I had fairly large bread slices. First, I broiled the Swiss cheese on the bread until melty.


Then topping with tomato and prosciutto and finishing on the stovetop. Delicious!!


These sandwiches made for a quick and elegant dinner. They were delicious and filling, I would have pushed one on The Roommate, if not for her strong aversion to cheese...such a strange child she is. I especially loved the Smokin' Golden Apple, the salty cheese and prosciutto played off the super tender and sweet golden delicious apple admirably. I want to thank my motorcycle-riding Dayton friend for the prosciutto inspiration, which totally brought it all together!


Monday, August 22, 2011

“Jack Can’t Talk Thai!”

 Ok, to motivate myself and all of the millions of people reading this blog, I think I should have a tentative meal plan for the week…so here it goes…

Monday (yup today) – Thai Peanut Noodles w Veggies

Tuesday – Two kinds of Grilled Cheese…I'm seriously craving some grilled cheese…

Thursday – Shrimp n' Grits…Going Away Partayyy!

Friday – Either Stuffed Peppers, or something for little sister's 19th Birthday!!


I have at least kept to the plan so far, yah I know it's only Monday, but I'm all about the little victories. Not too long ago I saw a recipe from SELF Magazine for Peanut Thai Noodles, which I thought looked interesting, but I knew if peanuts were involved I would need a lott of flavor. I mean, I love a good PB&J as much as anyone else, but every time I see a Thai recipe involving peanut butter all I can think of is attempting to scrape rice noodles and peanut butter off the roof of my mouth. Point being, I had to put a lot of research into devising my perfect Thai Peanut Noodle recipe. I was all over Allrecipes.com and of course Food Network, comparing and contrasting any recipe involving peanut butter, soy sauce, and rice noodles. Fiiinally, I felt prepared to attempt the most delicious Thai recipe Ever! And I definitely did!

Seriously, I called my little sister and rushed her over to partake in this Peanutty Bliss! I texted my work friend and told her I would be bringing some to work for lunch and she would be trying some! The Roommate was out, but as soon as she came home I rushed a forkful to her and insisted she try my latest creation…she's suuper patient. So I know you're all on the edge of your seats, waiting for this recipe…so here we go with…


The Only Thai Peanut Noodles You'll Ever Need 4-6 Servings

      8oz thin rice noodles

      1 Tbsp Seasame Oil (or Olive Oil)

      1 red or yellow bell pepper, chopped

      ½ lb sugar snap peas, ends trimmed

         Sauce:

            ¼ c + 1 Tbsp peanut butter

            2 Tbsp soy sauce

            1 Tbsp apple cider vinegar

            2 ½ Tbsp honey

            1/8 tsp cayenne pepper

            ½ tsp chilli powder

    
Soak rice noodles in hot water for 8-10 min until noodles are tender. Then rinse with cool water, to avoid clumping.


While the noodles are soaking, mix all sauce ingredients together over low heat until peanut butter is melted and sauce is combined. Keep sauce warm over very low heat, making sure it doesn't burn.


Heat oil over med-high heat in large saucepan. Sauté bell pepper and snow peas for 3-4 min, so they are hot but still crunchy.

      *If you wish to add meat, like chicken, now would be the time to sauté chicken strips until cooked through (6-8 min) – then add the veggies. This dish would be great with chicken or tofu!


Add rice noodles to veggies and toss/stir to evenly combine. Then stir in peanut butter sauce several tablespoons at a time, until noodles and veggies are all coated. Serve Immediately.


Sunday, August 21, 2011

Bits and Pieces...with a Little Trip to India...

First off, I'd like to thank a new friend from this weekend who helped me name this post. Ok, acknowledgments aside, it was a long weekend spent without my computer so I have some catching up to do...
Once again this past "Jersday" as The Roommate has dubbed it, my foodie friends and I got together for some sophisticated television, courtesy of our favorite East Coasters. Great people, catty television, all we needed were the eats! After much deliberation, we decided to try an Indian restaurant that we've had our eye on for a little while.

Aab India is located in Grandview and owned by a family that has 5 successful Indian restaurants in Cincinnati. They serve Northern Indian Cuisine and have takeout or dine-in available. The gorgeous interior is a great little surprise, as the exterior is super unassuming. We decided on takeout and showed up in relaxed, comfy clothes...we felt very under-dressed as the dining experience was clearly slightly more refined than our "jeans and tees" look! 

Let me tell ya, the food was outstanding! I tried a little of everyone's dish and each one was better than the last! The Roommate had never had Indian before and is a complete convert-we will be going back regularly for.sure! Ok, ok, here's what I got. I've only had Indian a few times so every menu is still my proverbial "candy store." I'd read a great review for Aab India's Chicken Tikka Marsala so that's what I went for this time. Of course, I had to have my naan! I got a garlic naan and a regular...seriously, I love naan. 

Getting home, we all tore open our "rations" and started digging in. I tried a keema samosa, or a fried pocket of beef, for my appetizer. It was crunchy and filled to the max with spiced beef-yum! They gave us 3 chutneys to try with them, although the chutneys were all delish, the samosas definitely stood on their own! The chutneys were a chili-onion, mint-cilantro, and a sweeter tamarind chutney. My Tikka Marsala was incredibly tender chicken pieces drrrenched in a creamy tomato-based sauce. I couldn't get enough! I got the medium heat option and it was just enough to make me feel the heat, but definitely not too much. The naan was, get this...still steaming hot when we got home! I seriously question whether I took a single breath as I inhaled the dish! 


I'm also kind of budget-conscious, their portion served me and my younger sister for dinner when she dropped by for a surprise visit! Then, I had a very filling portion for lunch the next day! There's very little that can cheer up a Friday at work like a seriously delicious lunch...or maybe that's just me?

The rest of the weekend was spent traveling to Dayton to take my Graduate Record Exam that I have been dreading for months. The test went well, but I am definitely ready to be back home and devoting myself to finding some great recipes! 

This week the plan is a Shrimp and Grits going-away dinner for one of my best friends before she heads back to school to be a physician assistant so I might someday live in her guest cottage...

I've also found a unique Strawberry-Melon Gazpacho recipe that I will definitely be trying out for a fresh end-of-summer dessert, looks incredible!

The goal is a recipe-a-day...get ready for some intense food blogging!

Thursday, August 18, 2011

I know my ABC's! Asparagus, Broiling, and Corn Grits (Polenta)

Ok, I have a dirty little secret which I am only sharing so at-home cooks who share my plight may comfortably come into the fold...I had never used a broiler until last night. OH YES my friends! I have played the "sophisticated chef" for years, all the while avoiding use of a broiler out of fear...until last night.


You see, the other day I found a recipe on SELF Magazine's website for polenta with roasted asparagus (one of my faves) and zucchini, drizzled in a roasted red pepper sauce. Well, I don't have a grill so in the summer, roasting has a special place in my routine meals. I also had never made polenta and I thought this would be a delicious, light meal. So I made a special trip to the store, ensuring my kitchen was adaquately stocked for my version of this recipe. When I got home and was reading through the recipe again while gathering my equipment, I saw that every.thing in the recipe except the sauce was BROILED! I'm not sure how I missed this large "detail" the first couple times I glanced over it, but miss it, I did. However, I often think things happen for a reason and decided that this clearly happened so I might conquer my unreasonable fear of the broiler. And let me tell ya, I love broiling! I doubt I'll cook any other way ever again!


For those of you who don't know what broiling is, many ovens have a setting on them that only turns on the top of the oven, directing intense heat to the top of foods. It is an excellent substitute to grilling, especially on a rainy day or if you are preparing the majority of the meal in the kitchen and do not have time to keep an eye on the grill outside as well. For some great broiling advice in detail check out this link! 


Now to the recipe, I adjusted it a bit as the only veggies I wanted to use were asparagus and zucchini, but you can use any roasting vegetables. The original recipe used asparagus, japanese and italian eggplant, zucchini, and cherry tomatoes. SELF Magazine also only seasoned their polenta with cayenne pepper, whereas I used my supply of Emril's Essence which I make and then store in an airtight container for months. I highly recommend making yourself some one evening, it is basically a mix of everything you have in your spice drawer and saves the time of sprinkling "a little of this and a little of that"


Emril's "All Purpose" Essence
     2 1/2 Tbsp paprika
     2 Tbsp salt
     2 Tbsp garlic powder
     1 Tbsp black pepper
     1 Tbsp onion powder
     1 Tbsp cayenne pepper (I only use 1/2 Tbsp because I don't want everything I use it in to have that much heat)


Ok, so fun with computers-somehow the rest of this post was deleted after I wrote it the first time...I'm going to attempt to recreate it as best I can...just another lesson to always back everything up!


Now to the actual recipe! When I originally made this recipe and had it for dinner, it was good. I won't post anything on here with the rating "good" so I was slightly concerned that I would have nothing to share from the experience. The main hitch was the sauce...there was just something a little off about it...something was missing and I couldn't figure it out. The next day I took it to work for lunch, it reheated really well...but there was still something not quite right. Then it hit me, SUGAR! I wouldn't be surprised if a lightbulb actually went off over my head! I grabbed the Splenda from my desk and sprinkled a little bit, mixed it up, and had to stop myself from  eating the sauce like a soup! A perfect example of how one little ingredient pushed a good recipe to a delicious recipe. And now, behold...

Polenta and Veggie with Red Bell Pepper Sauce (Now Roast It All!)


      1c uncooked instant polenta
      1/2c grated Parmesan cheese, then 1/3c for topping polenta
      1 T Emril's Essence, or 1/2tsp of each of the components
      Cooking Spray
      2 cloves garlic, chopped
      1/4c Olive Oil
      1lb asparagus, ends trimmed
      1 med-large zucchini, 1/3" slices


      Sauce
          1 12-oz jar roasted red peppers, drained
          1/3 chicken, or vegetable, broth
          1 large close garlic, chopped
          3 Tbsp fresh basil, chives, or parsley
          1 Tbsp balsamic vinegar
          1/2 Tbsp brown sugar (this is an estimate as I haven't had the chance to try the recipe w brown sugar)


Bring 3 cups water to a boil in a med to large saucepan. Add polenta steadily, whisking to combine. Reduce heat to medium-low and simmer, stirring, until thick-this took my instant polenta 1-2 min. Whisk in 1/2 cup Parmesan and season with Essence or your seasoning choice.
Transfer polenta to pie pan prepped with cooking spray, smooth into an even layer and let cool 15 minutes.
Heat broiler. Coat veggies in olive oil. Arrange veggies in a single lay on a baking sheet and sprinkle with salt and pepper, I added a little dash of Essence. Broil vegetables about 4-5 inches from heat until tender, 3 to 5 min on each side. Transfer to a platter and set aside.

Combine all sauce ingredients in a blender or food processor and blend until smooth.


Sprinkle polenta with remaining 1/3 cup Parmesan, again I thought this was a good place for an Essence sprinkle...I literally can't stop using it when I start. Broil polenta in pie plate until golden brown, 2 to 3 minutes, then cut polenta into triangles. Divide polenta among 4-6 plates. Layer veggies on top of polenta "pie piece" and drizzle with sauce. Serve any remaining sauce on the side.


Without Sauce
This recipe was fresh and delicious, but the polenta is also very filling. Every flavor from the veggies to the red pepper sauce comes through on it's own-but they all blend together very smoothly. And unless you missed this point...the sugar really brings it all together.

Wednesday, August 17, 2011

A "Whole" New Quesadilla!


Recently, I have been trying to eat healthier when I'm cooking for myself. I've found that cooking veggie and lean protein-based meals not only makes me feel less sluggish, but since I often eat meals for several days after I make them, the veggies last longer than meat. Of course when I go out with friends, or stop at my parents house; Chili Cheese Dip, sugar-laden cocktails, and Columbus' Famous Jeni's Splendid Ice Cream are all definitely on the menu!
However, eating healthy the days that I'm just staying home at least gives me the illusion of having a healthy lifestyle...


Back off my tangent, last night I wanted to get crazy and save the rest of my delicious soba noodle salad for lunch at work today, so I thought I'd get a little experimental and I'm soo glad I did!!!


A while back I was surfing the internet for recipe ideas, as I spend a good percent of my waking hours doing, and I came across a recipe on thekitchn.com for a flatbread topped with goat cheese crumbles, sauted onions, and basil.


It was beautiful and  those are three of my favorite ingredients, but goat cheese crumbles? I have a serious relationship with cheese and love a relatively high cheese to bread ratio, obviously crumbles just would not do. I thought maybe I could do a mini "flatbread" with a tortilla as the base and a spreadable goat cheese on the tortilla...ok now we're getting somewhere...and that somewhere is Cheeseland.


So off I went to Whole Foods. I found some whole wheat tortillas, which I had never tried before, and one of my favorite spreadable goat cheeses with garlic and herbs-yes! I thought basil would be too stong an indivdual flavor for what I was going for, so I picked up some fresh baby spinach...but looking back arugala would have been an amazing choice. I do so loove my spicy greens!


A slight rant, most people here would say substituting frozen spinach for the fresh is appropriate here. I am not a food snob and I will sub velveeta, yes, velveeta if I'm too hungry and can't wait for real cheese to melt in a dish. However, there are very few times that I will use frozen spinach rather than fresh and this is definitely not a time for thawing the green!

Ok, I apologize for the lecture-now back to the task at hand. When I started cooking last night, I was making a mini flatbread. Midway thru, I decided to put a second tortilla on top, making a kind of quesadilla-sammich-just to add a little more substance to the meal. The result.was.incredible. When I was finished, I had created...

The QuesadillaWich Chevre  1 serving


     1 med onion, sliced into rings
     1 Tbsp Olive Oil (or any cooking oil)
     1 Tbsp Brown sugar (can use white, or sugar substitute)
     1 Tbsp Balsamic Vinegar
     1 Handful Baby Spinach
     2.5oz Spreadable Goat Cheese (aka Chevre)
     2  8" Whole Wheat Tortillas (you can use regular)

     Heat olive oil in a medium or large frying pan over just-warmer-than medium heat. Add onions and stir, when onions are coated with oil, add brown sugar. Cook onions until they are soft and begin to brown, about 4-5 min. Add Balsamic Vinegar and allow to simmer about 1min, so the onions are coated and have absorbed the vinegar. Pour onions into bowl and set aside.

     Without changing the heat setting, add spinach leaves to pan. I didn't add extra oil because the pan was not completely dry and I wanted the spinach to soak up the rest of the oil. Saute spinach until they warm and begin to wilt, about 1.5min. Add spinach to onions and set aside.

     Spread the goat cheese on one side of both tortillas, like you're making a sandwich.

     Over med heat, place bottom tortilla, cheese-side-up, in the frying pan and place onion-spinach mixture over cheese side of the tortilla. Make sure to spread the mixture out evenly, but not too close to the edges, so the filling doesn't spill out. Top with second tortilla, cheese-side-down.

     Cook quesadilla-wich until one side is lightly toasted, about 1-2 min, then carefully flip and toast the other side for about same length of time. You just want both sides to be lightly browned and stiff to the touch, and the cheese to be warmed.

I sliced pizza-style and ate without utensils. The tangy acid and touch of sweetness from the brown sugar work spectacularly with the onions, and the fresh spinach flavor definitely held it's own.

*Mushrooms would also be delicious in here, maybe baby bellas? I would only use a handful of sliced mushrooms and add them to the brown sugar and onions after they become translucent, about 1 min of cook-time.

Tuesday, August 16, 2011

Soba Noodles, They're What's for Dinner!

Yesterday for dinner I had one of my favorite quick and healthy meals. I treated myself to shopping trips at both Fresh Market and Whole Foods so although I had a wonderful and fresh assortment of groceries, I had little time to prepare dinner before essentially turning into a hungry bear.

Because of this, I turned to one of my favorite creations, a soba noodle salad with a tangy and sweet Asian dressing.

First, a discussion on soba noodles, which I heard of for the first time on one of my favorite food blogs, 101Cookbooks.com
    Soba Noodles are a Japanese noodle made from Buckwheat and Wheat flours and are about the same thickness as spaghetti. They can be found in many grocery stores in the ever-vague "Ethnic Aisle" or with the pasta. I have a strong affinity for Japanese food, so as soon as I heard about the noodles I ran out and bought some! My favorite vegetable is Bok Choy, a chinese cabbage that is kind of a cross between celery, without the strings, and a tougher Romaine lettuce. Naturally, my first thought was to combine these!

I often bring dinner to lunch at work the next day, so I thought if I could make a cold salad with these noodles, it would be ideal. I remembered a salad I made several years ago with baby bok choy, a small and more tender variety-great for eating raw. The dressing for the salad had Soy sauce, white vinegar, sugar, and olive oil-I specifically remember never making it again because I couldn't find baby bok choy and the dressing had been FAR too sweet.

Well, sauteing the larger, more common Bok Choy makes it quite juicy and tender, and taking some of the sugar out of the dressing made it FAR more palateable. After a couple attempts, here is my perfected version of...


Cold Soba Noodle Salad  4-6 servings


     3oz Dried Soba Noodles, broken in half
     1 Head Bok Choy, chopped to bite-size pieces and stalk separated from greens
     1 Tbsp Seasame Oil (or Olive oil if that's what you have)
     1c sugar snap peas
     1 Tbsp sesame seeds (optional)
     1/2 Red Bell Pepper, chopped into thin, 1/2"-long pieces
     1 Medium cucumber, seeded and chopped

     Dressing
          1/4c White Wine Vinegar
          1/4c Sugar
          3 Tbsp Soy Sauce
          1/2c Olive Oil

In a large saute pan, heat sesame (or olive) oil over med-high heat until hot, add Bok Choy stalk pieces and saute until pieces become tender about 5min. Add pieces of greens, seasame seeds, and snap peas and saute until greens wilt. Remove pan from heat and set aside.

I prepare the dressing while boiling water for the noodles.

For the dressing, I generally put all ingredients (vinegar, sugar, soy sauce, and olive oil) together in a medium container with a lid and shake them vigorously. I shake again right before tossing with the noodles and vegetables.

Prepare soba noodles as directed by packaging, often they direct you to place them in boiling water for 4 min. Immediately remove noodles from heat when they are finished and rinse with very cold water for about 1 min, make sure they are cool to the touch.

In a large bowl, toss red pepper, cucumber, sauted bok choy and snap peas, and noodles with dressing. You may serve immediately, I prefer my salad to be chilled when I eat it so I refrigerate for about a half hour before I eat it.


My Foodie friend dropped by midway through my cooking, so I had her stay to try the final result...then had to pry her away from my dinner! Looked like a great review to me!

Monday, August 15, 2011

Jersey Shore & Apps

One of my favorite parts of being a young-er adult is the excuse to watch brutally intellectually useless television, such as Jersey Shore. This past week my Roomie, Foodie Friend, and I got together for some delicious apps, cocktails, and Snookie Meets Firenze...


One of the many lessons we learned; when everybody brings an app-it quickly becomes dinner...


My contributions to the night were;
  • Caprese Salad with garden-fresh tomatoes and basil and some serious slices of Mozzarella, doused liberally in Aged Balsamic Vinegar and "EVOO" (c/o Rachel Ray-the Tele-Chef I hate to love and love to hate).
    • Seriously, Caprese Salad is my favorite part of summer. Even here in the bipolar weather of the Midwest we can find beautiful vine-ripened tomatoes this time of year and they add the extra juice that makes a Caprese Salad really GO!


  • Hummus Deviled Eggs these were my experiment of the evening and turned out GREAT! Foodie Friend even compared them to some Truffle Deviled Eggs she'd had on her honeymoon last year-one of my proudest moments! My Roomie even took a second to break from her Buffalo Chicken Dip to have a bite...or three!
    • I wanted something easy and healthy to bring to the table, since Summer is winding down-I'm trying to walk away from my Chili Cheese Dip eating habits...not completely though!


  • Lemon-Basil Mohito Basil? In a cocktail? YES! Foodie and I attended a happy hour just over a year ago where we tried a Strawberry Basil Martini for the first time, it.was.amazing! Now we put basil in just about any cocktail we make. It instantly "classes" up any run-of-the-mill libation!


  • Buffalo Chicken Dip ok, ok, I already mentioned that it was the genius of my Roommate that provided us with this beloved favorite, but I do have a killer recipe for the dip that I wanted to share..so as they say-Without Further Ado...
                The Recipes


          Caprese Salad (pronounced ka-PRAY-zay) 2-3 appetizer servings


             Elegant, but super simple...
                  - 1 Large Beefsteak Tomato, sliced   (can also use two good-sized Plum Tomatoes)
                  - Basil leaves, whole-one per tomato slice
                  - FRESH Mozzarella Balls- one thick (1/4"-1/2") slice per Tomato slice
                  - Extra Virgin Olive Oil, enough to drizzle over each Caprese
                  - Aged Balsamic Vinegar, a generous drizzle over the Olive Oil.

            To assemble, layout tomato slices on serving plate, cover each with a basil leaf, follow each basil leaf with a slice of Mozz. Drizzle Olive Oil over every assembled piece and then generous douse with Balsamic Vinegar. Freshly ground pepper and some sea salt, even some dried oregano make excellent additions.
   
             Alternatively, you may use 3/4" cubes of tomato and mozzarella and chop the basil into ribbons to toss into an actual salad bowl. Dress with Balsamic Vinegar and Extra Virgin Olive Oil.

          Easy Hummus makes about 2.5 cups
           
           - 15oz can Chick Peas/Garbonzo Beans
           - 1/4c Tahini (crushed sesame seeds, found in the ethnic isle-or with capers and olives)
           - 1-2 garlic cloves, crushed (I used 2 large as I love garlic)
           - 2 Tbsp capers
           - 1/4c Extra Virgin Olive Oil
           - Salt and Pepper to taste

        Combine all ingredients except olive oil in food processor and blend until a thick paste is formed. Drizzle in olive oil, or add a little at  a time, processing between additions until paste has become a smooth dip-consistency. Serve with veggies, pita chips, or soft pita for dipping. Also incredible in a pita pocket with fresh veggies and bean sprouts as a healthy sandwich option.


          Hummus Deviled Eggs makes 24 deviled egg halves


             - 1/2c Hummus
             - 1/4c Mayo
             - 12 eggs
             - 2 tsp capers, chopped very fine, for garnish
        
           Place eggs in large pot and cover with water, bring water and eggs to a boil. Remove pot from heat, cover, and let sit for 10-12 min. Drain water, gently jostle eggs to crack shells, fill with cold water and let sit 3-5 min. Peel eggs carefully, then slice each peeled egg in half lengthwise. Scoop out hard boiled yolk and arrange egg whites on serving dish.


          Mix yolks, hummus, and mayo thoroughly. Place a spoonful of hummus mixture into each egg white, garnish with a small pinch of chopped capers. These do not stay beautiful long when exposed to the air, so make them right before serving and keep leftovers wrapped tightly in plastic.


          Lemon-Basil Mohito serves 1


          - 1-2 Basil Leaves, bruised (just rub them around between your fingers)
          - 1-2 berries (we had some frozen strawberries that we popped in)
          - 1 oz white rum (we used Bacardi)
          - Ice cubes
          - Lemonade made from powdered mix (we used Crystal Light)


    Muddle the bruised basil leaves and berries in a glass, if you dont have a muddler I've found the back of a large spoon works well. Add rum, may add more later "to taste." Fill glass with ice, Finish with lemonade. May garnish with lemon slice on glass. If you're really wanting to go the distance, dip the glass rims in lemon juice, followed by superfine sugar.


          Buffalo Chicken Dip serves about 15


          - 2 Boiled chicken breasts, shredded (or ~2c shredded, cooked chicken)
          - 2 (8 oz) packages cream cheese, softened
          - 1c Ranch Dressing  (may also use blue cheese dressing)
          - 3/4c Frank's Red Hot pepper sauce
          - 1 1/2c shredded Cheddar Cheese
          - Tortilla dipping chips


     Preheat over 350F. Mix all ingredients except 1/2c cheese together in casserole dish thoroughly. Top with reserved 1/2c cheese. Place in 350F oven for 20-25 min. This is a hiigh calorie snack, using lower fat versions of all ingredients will still taste delish, but cut down on some of those calories!
                  

August 15, 2011...My First Post!!

Good Morning!

I'm excited to finally have a medium to unlease my delicious musings unto the world! I have cooked for years, following the inspiration of my father, who managed to provide gourmet meals every night when I was growing up. I can still envision my mother by his side, sternly ordering us to "Sit down and eat our peas!" It is because of them that even through college, I regularly prepared my own delicious meals and intellectually devoured any cooking book, magazine, show, and blog I could find. For the past year or so, I have found that I have a wealth of recipes and ideas, but I cook the same things every week! Sit Down and Eat Your Peas is a tip-of-the-hat to my parents for raising a devout Foodie and an attempt to encourage me to expand my culinary horizons!

Photography is another passion of mine, that I consistently take part in by taking every photo on this site. I aim to make the food look as good as it tastes!